Mirc Setup
For a more descriptive explanation, see the message board at http://www.nitrolic.com or drop us a line at guildftpd@nitrolic.com
IMPORTANT NOTE: All variables need to in this format -> $!variable. Please be sure to have the !
Installation
After you have installed GuildFTPD and the script itself, you
have to load the script. You can do it two ways.
Here's the first.
1. Click the Tools Menu
2. Click the Remote Menu
3. Another window will pop up
4. Click File - Load / Script
5. Browse to the gftpd.mrc script
The second way is this.
1. In the IRC command line, type in the following: /load
-rs gftpd.mrc
2. Click YES and the script will be loaded
Now at the bottom (or top), you should see a @GuildFTPd
window beside all others. Click to view. If you right click
on the window you will be able to see GuildFTPd’s
powerful script options.

Script options:
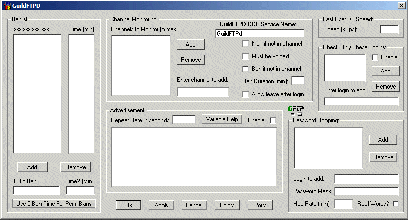
Nicklist Admin: Kick:
In the Nicklist of the @GuildFTPd window, you can
use this option to kick the user,
click the name of the user, and
right click/Admin/kick.
Nicklist Admin: Bans: You can also Ban a user with
the script, anywhere from forever
5, 10, 15, 30, 45, 60 or ? (user specified).
Status Update:
Update server information in the
@GuildFTPd window.
Clear Window:
Use this to clear information in the
@GuildFTPd window.
Now that we've covered the basics of GuildFTPd Script,
let's take a look at the options in detail.
Configuring GuildFTPd:

Ban List:
displays, IP, Time of banned user, below it you are
able to add another ip address and length of ban manually.
ñ Use 0 for permanent bans ñ
Kick And Ban:
This box contains:
-Channel(s) to monitor: the channel(s) the script will
verify all ip address's to.
-Kick if not in channel: enable this and any user that logs
on your server and is not in one of the monitored channel(s) will
be kicked.
-Must be voice: enable this to only allow voiced users
-Ban if not in channel: the same idea as Kick only if
they're not in channel(s). The only difference is that the
user will be banned.
+You can specify the length of the ban in Ban
Duration (see below)
-User can leave after login: This allows the user to leave
the monitored channel after login.
Advertisement:
This is where you are to place your "Timer"
ie.
My server is up! Ip:
You don't need to update your IP Port in the script,
you can use this:
IP address: $ip
ñ For all others right click Help/Variable
Help *in mIRC* ñ
-Repeat Rate (sec):by default input no less then 500,
this means that your timer will be displayed every (your set time)in
your
monitored channel, and the timer will post
your advertisement.
-Enable: This will enable/activate the timer.
ñ Note: remember when you restart mIRC, the timer will
automatically start. ñ
Fast User DL Speed:
This is the same as ñMaximum Transfer Rateñ on GuildFTPd
itself. If the user downloads faster then this preset, the
transfer will temporarily stall, until it slows to the preset.
Check only These Logins:
This option is if you have users that have private
accounts on your server, type in all logins you want the
script to manage, all other logins on your server will
not be monitored.
ñ To add, type in field box, click add. To remove
click users name, and then remove ñ
-Enable: to activate the login management, if not active it will
manage ALL logins.
Password Hopping:
GuildFTPd also comes with a password hopper, to stop
people from port sniffing you to gain access to your server.
-Login to add: add the present login here that you
would like to hop, Click add.
-Password Mask: ñ Default is CVCV ñ
-Hop Rate (min): Set this to the rate you want the password to
hop.
-Real Words: self-explanatory
ñNote: When using the password hopper remember to change
your timer message in the advertisement from pass: (your
password),
to pass: $gpa<the account name>

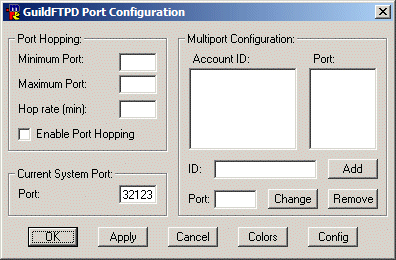
Port Hopping:
-
-
-Hop rate (min):Time intervals the Port hopper will
change the Port number.
-
ñ Note: To have the script update your timer, when using
the port hopper change your port to $ip in the advertisement
remember to leave spaces in front and after $ip for it to
work.
-Port: Current port of your server.
Multiport configuration:
This option is to set up specific accounts on on
different ports.
-ID: Type in the accounts login here.
-Port: Type in the port you want the ID to be listening
on, and click add, and that account will only be active on
that port.
ñ Note: You can change the properties of the account by
clicking the account, and change.
ñ Note 2:If you want on of the accounts to be viewed by
your timer, use $gpa<account>
Configure GuildFTPD colors: This allows you
to modify some of the colors displayed to help
you get quick information.

Configuring Logging:
-Enable: Check to enable Logging here.
-Date Logs: Check to have logs labled with dates.
-Log Folder: Browse to the folder you want to store logs
in.
Priveleged User Configuration:
-Add: Use this button to add ips/netblocks that will not
be checked in monitored channel(s).
-Remove: Use to remove ips/netblocks from list.
Stats:
-Enable/Disable: Enable and Disable the ctcp stats
function. (/ctcp NICK TRIGGER) (NICK is YOUR nickname see below
for trigger)
-Trigger: Set a custom trigger for ctcp stats. If no
trigger is specified !NICK-GFTPDstats is used. (NICK is YOUR
nickname)
Start GuildFTPD: Launch the GuildFTPD daemon
Help: Self explanatory.
